WE TEAMED UP WITH OUR FRIENDS AT WOODCRAFT SEATTLE TO BRING YOU THE STEP BY STEP AND FULL DESIGNS OF A SHIPWRIGHT’S TOOL TOTE. EDUCATOR JEFF MARSDEN AND RETIRED SHIPWRIGHT STEVE DANDO SHOW YOU HOW TO BRING THE TOTE TO LIFE.
“As an avid hand tool user, I am always on the lookout for a good toolbox or tote design. A friend of mine, a retired shipwright from Seattle, introduced me to the Shipwright’s Tool Tote. The Shipwright’s Tool Tote was traditionally made by shipwrights themselves to carry the tools of their trade while they were working on wooden boats. It had to be a very versatile and portable tool tote—for a wooden boat builder, time was money so a shipwright had to be able to carry the tools he needed around the boat to accomplish his day’s work. Running back and forth to the shop just wouldn’t do.


The tote had to big enough to carry a core group of tools but not be so heavy that once loaded it could not be picked up and carried with ease. To accomplish this the shipwright would use whatever strong but lightweight wood that was at hand. The wood joinery was kept simple for ease of construction and repair if needed.
The totes would often be fitted with a canvass cover to protect the tools from the weather. The cover could be rolled back and secured to give access to the tools as needed. I have sized this tote to be able to carry a core group of traditional hand tools that would be useful for accomplishing most tasks at home, at the cabin, or, well, on board your boat!
1 of 1
a shipwright had to be able to carry the tools they needed around the boat to accomplish their day’s work. Running back and forth to the shop just would not do.
For this build I have used poplar for the main body, beech for the handle, and black walnut for the pegs.
Simple through-tenons and glued pegs are used to hold the tote together. This simple design can be easily completed with hand tools or machine tools depending on what you have available.
The canvass weather flap is made from a 40” x 20” piece of #2 canvass. The canvass should be securely hemmed all around to fit between the ends. The canvass is then nailed to the taller side using copper nails. It can then be flipped over the tool storage area of the tote as needed.
Material used:
¾” x 10” x 12’ poplar
1-1/2” x 4” x 36” beech
2 – 3/8” walnut dowels
#2 canvass 40” x 20”
Tools required:
(Though the tote was built using stationary power tools, it can just as easily be built using hand or hand-operated power tools)
Handsaw or jigsaw
Hand drill with a 3/8” drill bit
¾” chisel
Mallet
Combination marking gauge
Tape measure
Straight edge
Wood glue
2 – 12” squeeze clamps
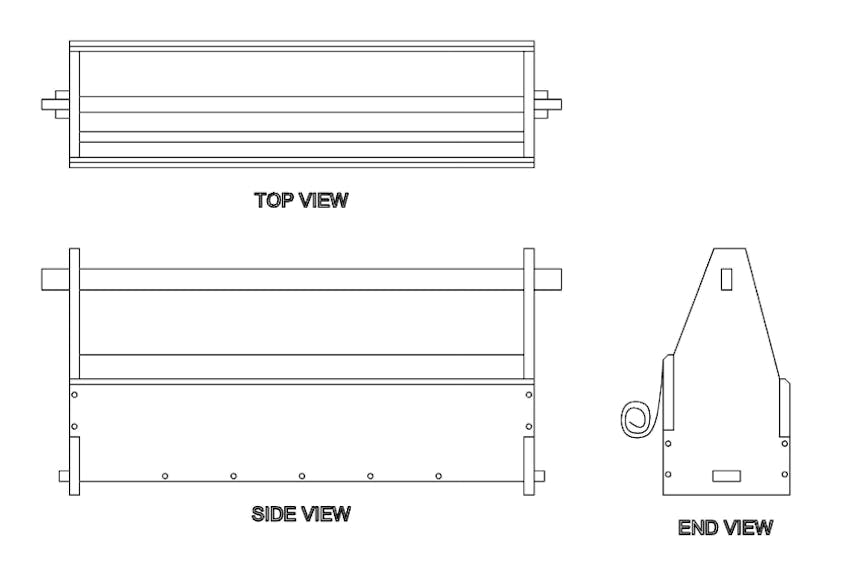
DESIGNS


step by step build
1. From the lumber yard choose a flat straight pine or poplar board ¾” x 10” x 12’ long. The piece should be free of knots and other defects. Also choose a maple, birch or beech board from which to cut the carrying handle. It should be 1-1/2” thick x at least 2” wide by 40” long.

2. Using a pencil or a piece of chalk, roughly lay out the pieces to be cut from each board. Each piece should be at least 1” larger than the finished piece.
3. Using a handsaw or jigsaw cut the oversized pieces from the boards.
4. Using the tape measure, combination marking gauge, and straight edge, mark the individual pieces to their final dimensions.
5. Using a handsaw or jigsaw cut each piece to its final dimension.


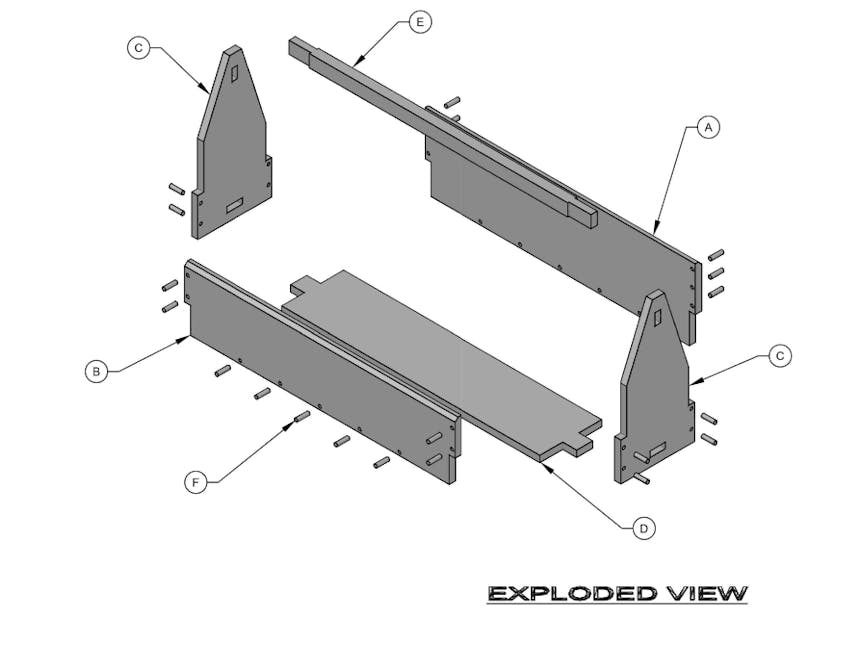
6. On the two end pieces, mark the mortises for the tenons of the handle and bottom board to pass through. As the size of the tenons can vary depending on the sizing of the lumber purchased, be sure to confirm the mortise measurements from the actual tenons on the boards.
7. Using the drill and 3/8” drill bit, drill a series of holes around the inside of the mortises.
8. Using the mallet and chisel carefully chisel away the narrow piece of bridge material between each drill hole until the hole is clear. Then slowly pare the wood back to the line, test-fitting the tenon as you go, until you have a nice fit. It should not be too tight so that the wood is able to expand and contract. It also should also not be so loose that the pieces rattle around.

9. Assemble all the pieces together, clamp the sides to each end, and set aside.
10. Cut the walnut dowels into 1-1/2”-long pieces; you should have a minimum of 26 pieces of dowel.
11. Using the drill and 3/8” drill bit, drill the dowel holes as shown in the drawing. Glue and tap into place a piece of dowel after each hole is drilled.
1 of 8
2 of 8
3 of 8
4 of 8
5 of 8
6 of 8
7 of 8
8 of 8
12. While the glue is drying on the assembled tote, measure the length and width of the storage area and cut the canvass to fit. Be sure to leave enough material to hem the edges in order to prevent fraying.
13. If you are lucky enough to have access to a heavy-duty sewing machine, hem the edges on the canvass. If not, then simply fold over the material to be hemmed and use the leather- sewing “saddle stitch” method. There are lots of videos on Youtube that will show you how to do this.


14. After the canvass flap is finished, use the copper nails to nail it to the top of the tallest of the two sides.
15. Saw, chisel, or sand the dowels flush to the surfaces of the tote.
16. You are now finished assembling the Shipwright’s Tool Tote. All that is left is to sand it all over and add a few coats of finish.
17. You can use the finish of your choice, or even paint it if you wish.
1 of 2
2 of 2